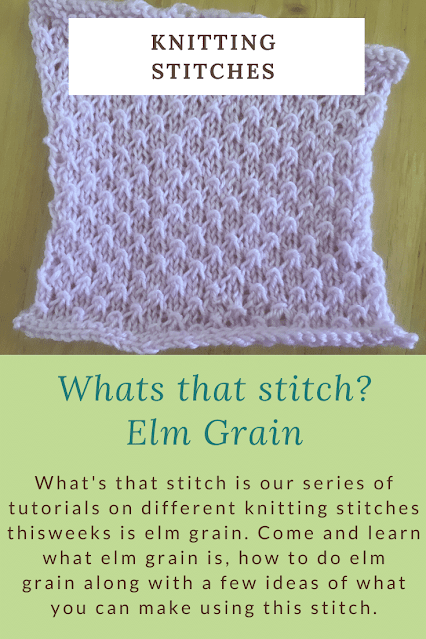
Welcome to what's that stitch series, this weeks knitting stitch is elm grain. I love how pretty this stitch looks. Learn what elm grain is, looks like, how to do elm grain, make your own elm grain square for a patchwork blanket and a few ideas of what you can make using this stitch. Grab our free printable handy elm grain stitch card with a photo of elm grain stitch on the front and on the back how to do elm grain stitch.
[Image description for image above: A photo of a lilac knitted elm grain stitch square with a white rectangle at the top inside it has the words "knitting stitches". A sage green rectangle with two white stripes underneath it is the words "What's that stitch? Elm grain, with the words "cozy woodland cottage knits . blogspot . com" at the bottom. End of image description.]
What is elm grain?
Elm grain is a pretty stitch, the yarn forward stitches slipped over two purl stitches creates a raised 3D stitch giving a nice grain texture. It also creates these on a diagonal which also makes it a bit interesting both the look and feel of it as your knitting and also afterwards. The photo below shows a close up of what elm grain stitch looks like and it's raised texture. It's exciting to knit up and see the texture and pattern of this stitch come alive.
 |
| [Start of image description: A close up of a lilac knitted square, showing the 3D texture of the elm grain. End of image description.] |
How do you knit the elm grain stitch?
Abbreviations
- yfd - yarn forward
- K1 - knit 1
- P2 - purl 2
How do elm grain
Come and learn how to knit elm grain stitch and practice the stitch pattern before trying a project using this stitch.
Cast on multiples of 4 +2 eg. 4+2=6 so you would cast on 6 stitches, 16+2=18 so you would cast on 18 stitches.
Row 1: Knit
Row 2: P1 *yfd, P2, pass yfd P2, P2*
Row 3: Knit
Row 4: P1 *P2, yfd, P2, pass yfd over P2
Repeat these four rows
We have tutorials on these which you can find by clicking them below:
If you are stuck on this I am happy to help, you can email me at: help@cozywoodlandcottageknits.com
Hope you have as much fun learning how to do elm grain stitch as I did, happy knitting.
Row 1: Knit
Row 2: P1 *yfd, P2, pass yfd P2, P2*
Row 3: Knit
Row 4: P1 *P2, yfd, P2, pass yfd over P2
Repeat these four rows
 |
| [Start of image description: A wooden table with the lilac elm grain square showing a finished elm grain stitch square. The edges of the elm grain are rolling up slightly. End of image description.] |
How to do a yfd and pass a yfd over
We have tutorials on these which you can find by clicking them below:
- Our step by step guide on How to do a yarn forward (yfd) in 5 easy steps
- Our tutorial on How to do a yarn forward(yfd), purl-2, and pass over in 4 easy steps
If you are stuck on this I am happy to help, you can email me at: help@cozywoodlandcottageknits.com
Free printable handy stitch cards
We have made you a free printable elm grain handy stitch card for you, you could keep this in your knitting bag/basket, punch a hole and it on a key ring or get a piece of string and tie it onto the card. There is two elm grain stitch cards to choose from a sage green background or a white background, each has how to do elm grain stitch on the back of the card.
What can you make using elm grain?
Elm grain tends to roll up a little bit as you can tell from the square I knitted above. To stop elm grain from rolling up you can block the knitted item or add a garter stitch boarder of about 4 rows and 4 stitches either side of the elm grain like I did for the elm grain stitch square (pictured below). Elm grain would look lovely on a jumper, a scarf or would also look nice on a throw with a matching cushion cover.
How to make your own elm grain square for patchwork blanket
You need to know how to:
- Cast on
- Cast off
- How to do a yarn forward and pass 2 stitches over
- knit
- Purl
To make 1 square you will need:
- 5mm knitting needles
- DK/8ply yarn
- 25grams yarn
- Pen
- Paper
- Row counter (If you do not have a row counter you can use the paper as well and just use a different colour pen or use a pen and a pencil)
- Yarn needle or tapestry needle to thread in ends.
Tips:
- To keep track of the row mark the row repeats on paper and keep track of the rows using a row counter.
- If you do not have a row counter you can use the paper and just use a different colour pen or use a pen and a pencil
- If you cast off too tightly use a stretchy cast off
Gauge:
10x10cm
18 stitches and 28 rows
If its too big go down a needle size and if it's too small go up a needle size.
18 stitches and 28 rows
If its too big go down a needle size and if it's too small go up a needle size.
Pattern:
Cast on 38 stitches
Row 1: Knit
Row 2: Knit
Row 3: Knit
Row 4: Knit
Row 5: Knit
Row 6: K4,*yfd, P2, Pass fyd over P2*, P2, K4
Row 7: Knit
Row 8: k4,*P2, yfd, P2, Pass fyd over P2*
Repeat from row 5- row 8 5 times (Tip: To keep track of the row I mark the row repeats on paper and just keep track of the rows using a row counter. If you do not have a row counter you can use the paper and just use a different colour pen or use a pen and a pencil)
Knit the next 4 rows and cast off.
Knit the next 4 rows and cast off.
Hope you have as much fun learning how to do elm grain stitch as I did, happy knitting.


6 comments:
it is so decorative - have to try it. thank you for sharing the pattern :)
Awh thanks :-) it is such a pretty stitch
How interesting. I have not heard of elm grain before. Thanks for sharing and joining Ginx Woolly Linx Party.
Thanks, there are so many different stitches in knitting. Awh thanks for letting me join your Ginx Woolly Linx Party there are some really awesome projects on there. :-)
Cast on multiples of 4 +2 eg. 4+2=8 so
???? ... my math computes to 4+2 = 6.
Hi, sorry for the confusion, yes that is correct I made a typo sorry. Also sorry for the late reply I have been unwell and haven't been on here.
Arjaye-Rose
Cozy Woodland Cottage Knits
Post a Comment