I can't believe after 10 years of knitting I've never learnt how to do a slip knot or how to to do a long tail cast on before 2018. In this guide you will learn how to do a slip knot and how to do a long tail cast on step by step.
[Start of image description for image above: A photo of Arjaye holding a knitting needle and yellow yarn wrapped over her fingers ready to do a long tail cast on. On top of the photo at the top is a white rectangle and the words "Cast on and off methods". Underneath is the word "tutorial" at the bottom. End of image description.]
This post has been updated with new content, images, image descriptions, pdf free printables for you and a question and answer section at the end.
I learnt how to do a long tail cast on while learning how to knit continental and thought I'd show you how to do a long tail cast on . I found learning how to do a slip knot a bit of a challenge, while learning how to hold the yarn for the long tail cast on was the easy part. I've found it is quite easy once you do it a few times and it's become my favourite way to cast on.
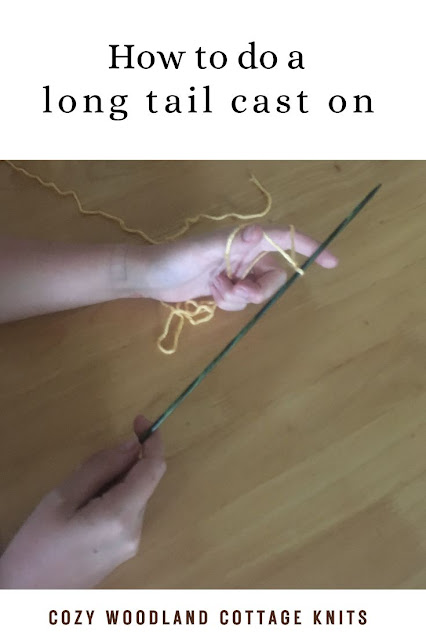
[Start of image description for image above: A white rectangle with the words "How to do a long tail cast on on it" Underneath is a photo of Arjaye holding a knitting needle and yellow yarn wrapped over her fingers ready to do a long tail cast on. At the bottom is a white rectangle and the words "By Cozy Woodland Cottage Knits" at the bottom. End of image description.]
What is long tail cast on?
There are many cast on methods in knitting, the long tail cast on is commonly used in continental knitting and can be used in English knitting as well. It is also the quickest way to cast on stitches and the easiest for a beginner to do.How to do a long tail cast on
Making a slip knot
Here is a free printable tutorial on how to do a slip knot in 5 easy steps handy for putting in your knitting journal or with your knitting patterns or in your knitting bag/basket.[Start of image description: A wooden table with a yellow string of yarn in the shape of a n. End of image description.]
[Start of image description: A wooden table with a piece of yellow yarn in the shape of a circle with the
ends of the string in opposite directions. End of image description.]
3. With the same yarn make a n loop using the end not attached to the ball of yarn like the one pictured below:
[Start of image description: A wooden table with a piece of yellow yarn in the shape of a circle with the
ends of the string in opposite directions. The end not attached to the ball of yarn is made into an n
shape End of image description.]
4. Put the n loop you made in step 3 through the circle loop you
made in step 2.
[Start of image description: A wooden table with a piece of yellow yarn in the shape of a circle with the
one end made into the shape off and n. The end made into a n has been put through the circle made in
step 2. End of image description.]
5. Pull the loop through the circle and you’ve made a slip knot.
[Start of image description: A wooden table with a piece of yellow yarn that has a slip knot loop to go
on the knitting needle with a knot underneath it. End of image description.]
How to do a long tail cast on
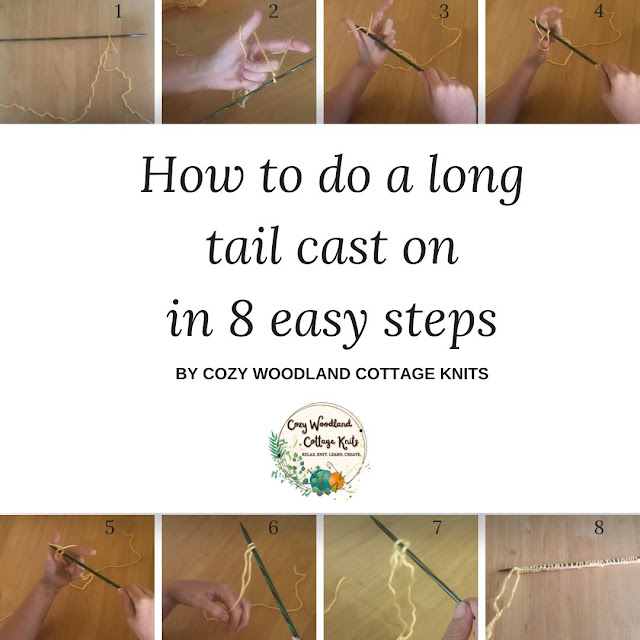
Here is a free printable 8 step tutorial on how to create a long tail cast on, handy for putting in your
knitting journal or with your knitting patterns or in your knitting bag/basket.
[Start of image description: Steps 1-4 are along the top with a sage green square in the middle with the
words "how to do a long tail cast on in 8 easy steps and the words "By Cozy Woodland Cottage Knits"
with steps 5-8 at the bottom. (these steps are explained in more detail below).The link on the image
goes to a pdf photo tutorial on how to do a long tail cast on, this link is the same as the one above. End
of image description.]
1. Make a slip knot following the guide above for a slip knot. Place the slip knot on the needle (this is the needle you hold in your right
hand) and your ready to begin casting on. This also counts as the first knitting stitch as well.
[Start of image description: A wooden table with a piece of yellow yarn on a knitting needle after a slip knot has been made and put onto the knitting needle. End of image description.]
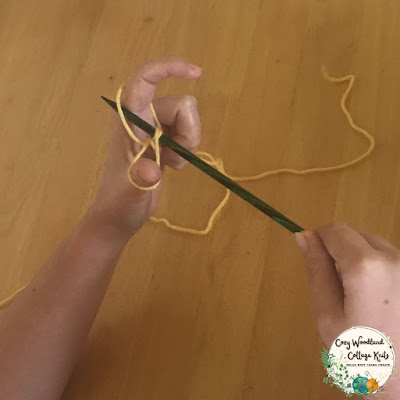
2. With your right hand hold the knitting needle and with your left hand place your thumb and index finger between the two stands of yarn. Then bring the needle down so it looks a bit like an m in your hands like the picture below.
[Start of image description: A photo of a wooden table in the background with Arjaye's left hand
holding the yarn from the slip knot with one piece of yarn over her thumb and the other piece of yarn
held over her index finger with the stands loosely held in the palm of her hand with her other fingers.
Her right hand is holding the knitting needle. End of image description.]
3. Place the needle under the stand of yarn where your thumb is.
[Start of image description: A photo of a wooden table in the back ground Arjaye has the yarn one
piece of yarn over her thumb and the other piece of yarn held over her index finger with the stands
loosely held in the palm of her hand with her other fingers. Her right hand is holding the knitting
needle and is under the loop of yarn around Arjaye's thumb. End of image description.]
4. Place the needle through the strand of yarn by your index finger.
[Start of image description: A photo of a wooden table in the back ground Arjaye has the yarn one
piece of yarn over her thumb and the other piece of yarn held over her index finger with the stands
loosely held in the palm of her hand with her other fingers. Her right hand is holding the knitting
needle and she is putting the needle through the strand of yarn by her index finger. End of image description.]5. Bring the needle back through the loop where your thumb is.
[Start of image description: A photo of a wooden table in the back ground Arjaye has the yarn one
piece of yarn over her thumb and the other piece of yarn held over her index finger with the stands
loosely held in the palm of her hand with her other fingers. Her right hand is holding the knitting
needle and she has bought the needle back through the loop where her thumb is. End of image description.]
6. Let go of the yarn in your left hand and then pull both ends of the yarn, it should look like the photo below.
[Start of image description: A photo of a wooden table in the back ground Arjaye is loosely holding
the yellow yarn between her thumb and index finger. Her right hand is holding the knitting
needle. End of image description.]7. You should have two stitches on your needle one from the slip knot made when you started and one just made from following steps 2-6 as shown in the photo below.
[Start of image description: A photo of a wooden table in the back ground Arjaye is holding
knitting needle with two knitting stitches on it. One is from the slip knot and the second is from
making a stitch following steps 2 -6 End of image description.]
8.
Q and A on Long Tail Cast on
Yes it is always counted as the first stitch
Do you count the cast on row as the first row of knitting?
No it is not counted though it does create a nice edging that looks pretty and is more stretchy.
How much yarn do you need?
To work out how much yarn you need for the long tail cast on you add an inch for each stitch you need to cast on and I like to leave a bit more of a tail so add about 10 inches to this.
eg. if you need to cast on 16 stitches you need 16 inches for your stitches + 10 inches for the tail = 26 inches.
Often there will be some left over but I'd rather have a bit more yarn than not enough and have to start over again.
Please leave a comment below if you have any questions about how to do a long tail cast on.
Thank you for visiting Cozy Woodland Cottage Knits!
Have fun learning how to do a long tail cast on. Don't forget to download your free printable tutorial on how to do a slip knot in 5 easy steps and free printable tutorial on how to do a long tail cast on . Check our tutorial library for more tutorial posts like this one.
[Start of image description: Arjaye's signature with a blue feather floating in the air. Below is a meadow with yellow flowers with a a basket of pastel yarn and a hedgehog next to it. In the middle is two toadstools and a black cat running through the grass. End of image description.]


2 comments:
I’ve never tried this technique but it sounds useful if it’s a bit more stretchy as you say, thanks
Thanks, I tend to knit quite tight so really notice the difference between the two.
Post a Comment